diyrebel

joined 2 years ago
MODERATOR OF
[–] [email protected] 1 points 4 days ago (1 children)

I appreciate the guidance. But I think I can rule out insulation breakdown because I just removed the cover to the tacho generator and the ring magnet was broken in two pieces.


My washing machine had the same symptoms as this one, which is the same make but different model. It suggests a bad tacho. I need more certainty before buying parts.

The state worsened. Now I just get a non-stop continuous blinking LED with all flashes evenly spaced (thus no error code).

Someone told me the advice on this page is sketchy. IIUC, that page says to hand-spin the motor while the tacho is connected to an ohms meter. I get very little variation. If I give it a spin as fast as I can, it goes from 52 Ω to 52.8 Ω.. or 53 Ω on one occasion. Someone said it’s wrong or bad to put current through an ohms meter. So is that a bad test?

There are different kinds of tachos. Mine uses a coil, which I suppose implies that I an dealing with the rotating magnet variety.

voltage test (I am ill equipped)

Some people apparently read the AC voltage of a tacho while spinning it. My meter only has 2 scales for AC voltage: 500 and 200, which are far too high to detect anything. Should I buy a meter that detects AC mV?

Hz test (I am ill equipped)

My meter does not have frequency. Should I buy a meter with Hz?

scope test ~~(I am ill equipped)~~

Apparently an oscilloscope app can be fed by a smartphone’s mic input. But I do not have an AOS 6+ phone.

(edit) There are a couple FOSS desktop apps:

  • PulseView
  • xoscope (I will not link it because the project is Cloudflare-jailed)

So I might try this. I think the input can simply be wired to the mic input, but it’s better to build a circuit:

earphone test (strange result)

I connected the tip of the 3.5mm phono connector for audio headphones to one tacho lead and the middle segment to the other lead. When I spun the drum by hand, it sounded in the right speaker just like the drum sounds to my naked ears as it spins. That can’t be right. Must be all in my head. Is this test useless?

compass test (unlikely to be useful)

I could theoretically run a compass app and hold the smartphone up next to the tacho as it spins to see if the magnet is still magnetic. But I’m told it’s unlikely that the magnet became demagnetized unless I sent 230 VAC to it -- (and I did not).

hotwire tests on other components

  • 230 VAC → universal motor (spins fine)
  • 230 VAC → drain pump (spins fine)
  • 230 VAC → water inlet valves (opens fine; water flows)

what now?

I don’t understand why a tacho would go bad. So how should I test my tacho? Should I buy a meter that does frequency and low AC voltages?

Ultimately I need to know what the PCB thinks is broken whenever it is told to run a program. Is the PCB doing an ohms test to test the health of the tacho?
[–] [email protected] 1 points 1 week ago* (last edited 1 week ago)

i just see a blank page where an article would go. There is a giant ad at the top and typical garbage down the sides and at the bottom, but no text in the article to read.

(edit) is it just an image? I have images disabled so I wonder if that’s my issue.

[–] [email protected] 1 points 1 week ago* (last edited 1 week ago) (3 children)

Thanks for the feedback! So I guess I should buy a megger. Wow.. not cheap. I think I see these at local 2nd hand street markets. I often thought “what strange multimeter.. so few functions” but I didn’t realize what I was looking at. I will look for something that dials “500V” and has fewer modes than a multimeter, and ideally a “MΩ” printed somewhere although it looks like they won’t all print that on the device. I should probably learn how to test the megger itself so I buy something that works.

I suppose I could try to bring the motor into an appliance repair shop and pay them to test it with a megger.

As far as diagnosis of the whole machine-- suppose it’s true that I have an insulation failure. The control panel LEDs light up correctly when powered on, then when I try to start a program the start button just blinks. Does it seem viable or likely that faulty insulation would cause the controller to behave that way? I get the impression that the blinking LED means the controller detected an unspecified fault of some kind & refused to continue, which tempts me to think that the controller is functioning correctly -- unless it’s a false positive of a failure.

I really want to avoid replacing multiple major parts because I don’t imagine I can return special ordered parts.

(update) At the street market I saw something like this for €100:

https://www.tekcoplus.com/cdn/shop/products/gain-express-gainexpress-Multimeter-SM-852B-set_1024x1024.jpg?v=1553658696

which was apparently a lousy price. I also saw a megger for €160 that looked kind of like this:

https://cdn.globalso.com/hvhipot/GD3128-Series-Insulation-Resistance-Tester2.jpg

I guess that’s what I need. It’s probably a good price for what it is, but not justified for my mission.

[–] [email protected] 1 points 1 week ago* (last edited 1 week ago) (5 children)

Right but I think that safety capacitor (SC) is the last thing I care about. IIUC, I could perhaps even simply bypass the SC because it’s merely improving the power quality/safety. It’s not worth buying an SC unless I can fix whatever is broken. If I could get the machine working, I could then of course consider replacing the SC as a final protective measure -- but I’m not even sure anything is wrong with the SC.

The task at hand is testing every essential component of the washing machine, starting with the motor and tacho. I would like to understand what happened with the SC and motor though. Did I wire the motor wrong which caused the SC to flash and produce bad output for a moment? I don’t want to repeat that. I could power the motor directly without the SC, but if the motor is doing upstream damage then I guess I wouldn’t want my breaker box on the chopping block.


cross-posted from: https://lemmy.dbzer0.com/post/36272192

My washing machine is dying in stages. It started with the same symptoms as this thread. Specifically, after filling the tub for a wash cycle, it would go straight into a high-speed spin (full of water!) for a second or two (instead of the expected slow tumble), then quit. The speculation is that the tachometer is failing.

Then the machine got worse. I now cannot even start any program. No matter what program I select, I press start and after a few second pause the start button LED just blinks. It’s a generic blunt signal of a fault. The blinks are evenly spaced non-stop, so there is no error code of any kind.

To test the universal commutative motor, I followed the linked video and took resistance measurements. All seems okay in that regard (but this is based on vague resistance ranges that are not specific to my machine). Test results:

tachometer

Expectation: any reading that is not infinite/disconnected is fine.

  • (video): 70 Ω
  • (my motor): 52 Ω

carbon brushes:

Expectation: should be in the range 1—7 Ω

  • (video): 5 Ω
  • (my motor): 3.45 Ω

field windings:

Expectation: all combinations should be 1-7 Ω

  • (video): 3.5 Ω
  • (my motor): pin1-2: 1.35Ω, pin1-3: 1.35Ω, pin2-3: 1.9Ω

I do not have whatever model is in that video, but my readings are in the range suggested by the video presenter, fwiw. I believe my testing is incomplete because I was expecting the tachometer to be bad based on the behavior.

Motor spin test (hotwiring)

My next move was to try to make the motor spin. There is no service manual or wiring diagram for my Beko. So I inspected the motor and derived these pins (quotes are labels on the PCB):

1 (field) brown socket → brown+white “stator M” 2 (field) black socket → purple+white “stator 1” 3 (field) blue socket → red+white “commu” (commutator) 4 (brush) white socket → purple+yellow “rotor 2” 5 (brush) red socket → green+red “rotor 1” 6 (tacho) yellow socket → green “tacho” 7 (tacho) yellow socket → green “tacho” 8 (ground) green+yellow socket → green+yellow

Someone suggested this wiring:

L → pin 1
N → pin 5
jumper connecting pins 3 & 4

I did not connect direct to the wall because I wanted to use the mechanical power button of the machine to turn on and off the motor (so I could quickly cut power if needed). So power took this path:

wall (220 VAC) → safety capacitor → mechanical button → motor (wiring redirected to motor instead of control panel)

When I switched it on, the motor spun for 1 or 2 seconds and I saw a white flash (I think) and the motor quit. I turned it off. Then tried to switch it on again. No response.

220 VAC quit coming out of the safety capacitor. Instead the voltage jumped around between 10 VAC and 20 VAC. So I thought I fried the capacitor or resisters therein. I checked the motor to see if any of the pins connected to ground (answer: no, so the motor was not harmed). Then I disconnected the safety capacitor and connected it just to mains and ground. 220 VAC was output (WTF.. why does it magically work again?)

I think I’m back to the state it was in before I tried to power the motor. But I want to understand why the safety capacitor apparently flashed white and temporarily died with only 10—20vac output. I need to get to the bottom of this because I still need to test the motor for more than 1 second in a way that doesn’t cause more white flashes. Is it a bad idea to have the safety capacitor in the circuit?

[–] [email protected] 1 points 2 weeks ago

I appreciate the explanation. Interesting to hear the term “was motor”, which I always thought of as a valve but I guess the fact that the wax moves a valve it’s sensible to call it a motor. IIUC, it’s similar to thermostatic shower mixers, but with a floor temp of 5°C.


Wall radiators have a valve that has this progression of settings: “❄ 1 2 3 4 5”. Naturally as you turn it a pin changes position which opens a mechanical valve a precise amount.

The question is what happens at “”? I always thought of that as zero, completely closed. But my central boiler seems to target 5°C/40°F even when off to protect pipes from freezing. So what happens if all the radiator valves are off/closed (❄) and the boiler is triggered to prevent freezing? Does each valve also have a thermostat to open at freezing?

I thought for years the snowflake just meant cold (closed). But I wonder if it actually means frost protection, where it does something smarter. There are times when it’s in that ❄ position and yet the radiator still heats up. I thought the valve was broken, but then other radiators occasionally did the same. Is that normal?

[–] [email protected] 1 points 2 months ago* (last edited 2 months ago) (1 children)

It did not seem to struggle to spin. It seemed to have the muscle to spin with a load and water, but crapped out after ~2 seconds every time. ~~Then after trying a few programs it died harder, so nothing happens and it just blinks. I can’t even start a program now. I wonder if the motor driver board would break progressively like that.~~ (edit: I forgot to turn the water back on after hooking back up, so the condition did not deteriorate.. it’s back where it was [starts to spin then quits]).

Thanks for the tip. I try to focus on that component. I wonder if I can send raw power to a couple terminals to test the motor.

[–] [email protected] 2 points 3 months ago* (last edited 3 months ago)

I appreciate the feedback.

The rapid spin that happens in the wash cycle is with the tub full of water. It does not drain it at that time, which is bizarre. So it’s not trying to dump water. It’s a cheap Beko so I don’t suppose it would necessarily be as smart as other machines. When I forcibly cancel the program by holding the start button for 3 seconds, then it drains as part of the termination sequence. In the spin-only program I can hear the pump for a second between spin attempts, but it’s a dry tub in that test.

No matter what program I am running, it makes 4 or 5 attempts to high-speed spin the quits with a blinking start button light. But every task seems fine. Fills with water without issue, drains without issue, spin looks good until it gives up. It’s just opting to do the wrong task. I guess a sensor of some kind could be the culprit. Youtube is a piece of shit lately with Google’s protectionism but I might try to see if I can reach videos on this machine.

Beko is a popular cheap brand. Not sure about part availability yet. It’s a Beko wmd 26125 T.

Found repairportal.beko.com but it’s broken for me. Though archive.org’s 2022 copy of that site suggests they have spare parts.


The wash cycle is broken. Just after the tub fills, it does a high-speed 2 second spin, as fast as it can get in 2 sec before pausing. Then it pauses for at least a minute. Then it tries again, repeatedly. It’s really strange. Why would it try to do a high-speed spin with a tub full of water? Normally in the wash cycle it just spins very slowly in one direction, then changes direction periodically.

Whatever it’s doing, it gives up and the start button just blinks, which is apparently a blunt non-specific way to say there is a problem. I tried reducing the load to just a couple t-shirts for diagnosis and it still does this even with a nearly empty drum.

The manual does not list this behavior in the troubleshooting section. And I found no chatter about this behavior in web searches¹. This problem sounds similar but in their case it happens in the spin cycle. In my case it strangely happens in the wash cycle.

  • Hand wash program (empty drum): it still tries a high-speed spin in the wash cycle. A hand-wash program should probably not even consider doing that.
  • Spin program (empty drum): indeed there is a whole program just for spinning and draining. When I run it empty, it high-speed spins for 2 seconds and quits just like with the other programs. It looks like a perfect spin and sounds like it always has. It pauses for a minute then tries again, repeatedly.

~~Update: things just got worse. Now it will not do anything. Power on → start spin program (or any other program) and the start button just flashes. It’s detecting a fault of some kind without doing anything.~~ (edit: I forgot to turn the water back on after hooking back up, so the condition did not deteriorate… it’s back where it was [starts to spin then quits]).

I removed the back panel. Belt looks fine as far as I can tell. Removed the top cover. Springs are fine. Nothing looks unexpected. I pulled all the connectors off and re-sat them. Noticed a sticker dated 2009. Plugged it back in and same problem. Blinks like there is a fault and does nothing. The author of this post took various measurements. I have a multimeter but no idea what to check. I’m not even sure what one of the components is.

Apparently what I need most is the service manual at this point. Right to repair laws have been negotiated for the past 10 years and still nothing is enacted. It’s killing me. There should be an r2r infra in place by now so we can get manuals.

¹(update 3 months later: found another thread on the same problem here. Apparently it’s a broken tachometer.)

[–] [email protected] 1 points 4 months ago* (last edited 4 months ago)

IRC for Android ← antithetical to privacy
IRC for linux PCs that can be hardened and routed over Tor ← privacy respecting

This thread does not belong here.

[–] [email protected] 1 points 4 months ago

I don’t have one yet. But I would love to play with using it as a radio pager.

[–] [email protected] 0 points 5 months ago* (last edited 5 months ago) (1 children)

I’d rather see mods have less power not more

I would rather see mods ~~have~~ use less power, not more.

When you give them blunt instruments, you encourage excessive use of power. When you give them only an AK-47, they will use that to cut the head off a chicken rather than a machete (as you withheld the machete as it would be too empowering).


When an arrogant presumptuous dick dumps hot-headed uncivil drivel into a relatively apolitical thread about plumbing technology and reduces the quality of the discussion to a Trump vs. $someone style shitshow of threadcrap, the tools given to the moderator are:

  • remove the comment (chainsaw)
  • ban the user from the community (sledge hammer)

Where are the refined sophisticated tools?

When it comes to nannying children, we don’t give teachers a baseball bat. It’s the wrong tool. We are forced into a dilemma: either let the garbage float, or censor. This encourages moderators to be tyrants and too many choose that route. Moderators often censor civil ideas purely because they want to control the narrative (not the quality).

I want to do quality control, not narrative control. I oppose the tyranny of censorship in all but the most vile cases of bullying or spam. The modlog does not give enough transparency. If I wholly remove that asshole’s comment, then I become an asshole too.

He is on-topic. Just poor quality drivel that contributes nothing of value. Normally voting should solve this. X number of down votes causes the comment to be folded out of view, but not censored. It would rightfully keep the comment accessible to people who want to pick through the garbage and expand the low quality posts.

Why voting fails:

  • tiny community means there can never be enough down votes to fold a comment.
  • votes have no meaning. Bob votes emotionally and down votes every idea he dislikes, while Alice down votes off-topic or uncivil comments, regardless of agreement.

Solutions:

I’m not trying to strongly prescribe a fix in particular, but have some ideas to brainstorm:

  • Mods get the option to simply fold a shitty comment when the msg is still on-topic and slightly better quality than spam. This should come with a one-line field (perhaps mandatory) where the mod must rationalise the action (e.g. “folded for uncivil rant with no useful contribution to the technical information sought”).
  • A warning counter. Mods can send a warning to a user in connection with a comment. This is already possible but requires moderators to have an unhuman memory. A warning should not just be like any DM.. it should be tracked and counted. Mods should see a counter next to participants indicating how many warnings they have received and a page to view them all, so as to aid in decisions on whether to ban a user from a community.
  • Moderator votes should be heavier than user votes. Perhaps an ability to choose how many votes they want to cast on a particular comment to have an effect like folding. Of course this should be transparent so it’s clear that X number of votes were cast by a mod. Rationale:
    • mods have better awareness of the purpose and rules of the community
    • mods are stakeholders with more investment into the success of a community than users
  • Moderators could control the weight of other user’s votes. When 6 people upvote an uncivil post and only 2 people down vote it, it renders voting as a tool impotent and in fact harm inducing. Lousy/malicious voters have no consequences for harmful voting and thus no incentive to use voting as an effective tool for good. A curator should be able to adjust voting weight accordingly. E.g. take an action on a particular poll that results in a weight adjustment (positive or negative) on the users who voted a particular direction. The effect would be to cause voters to prioritize civil quality above whether they simply like/dislike an idea, so that votes actually take on a universal meaning. Which of course then makes voting an effective tool for folding poor quality content (as it was originally intended).
  • (edit) Ability for a moderator to remove a voting option. If a comment is uncivil, allowing upvotes is only detrimental. So a moderator should be able to narrow the ballot to either down vote or neutral. And perhaps the contrary as well (like some beehaw is instance-wide). And perhaps the option to neutralise voting on a specific comment.
[–] [email protected] 1 points 5 months ago

I forgot to mention, this problem is solved. It mysteriously fixed itself. After unplugging a connector and reconnecting it, the sensor started working again.

[–] [email protected] 2 points 5 months ago* (last edited 5 months ago)

The metadata in the headers can be avoided using Memoryhole and similar protocols which embed the headers inside the encrypted payload. The problem is again barrier to entry. Low-tech users generally can’t even handle app installs on desktops.

When you say “worry”, that’s not the right word for it. My boycott against Google is not fear-driven. I will not feed Google anything it can profit from as an ethical stance. Even if an expert linux tor user were on Google, I’m not sure we could exchange email in a way that ensures Google gets no profitable data. If we use PGP coupled with Memoryhole to strip out the headers, I’m not sure Google would accept a msg with a missing or bogus From: header. But if so, Google still possibly learns the user’s timezone. Though that may be useless if Google learns nothing else about that user. But we’re talking obscure corner cases at this point. Such an expert user would have no Google dependency anyway.

MS/google-dependent friends are generally extremely low-tech. They don’t know the difference between Firefox and the Internet. They don’t know the difference between Wi-Fi and Internet. Linux -- what’s linux? They would say. At best, they just think of it as a mysterious nerd tool to be avoided. So what can I do wholly on my end to reach them via gmail without Google getting a shred of profitable data? Nothing really. So I just don’t connect directly with a large segment of friends and family. Some of them are probably no longer reachable. Some are in touch with people who connect to me via XMPP, so sometimes info/msgs get proxied through the few XMPP users. It’s still a shitshow because Google still gets fed through that proxied inner circle of friends and family. In the past when someone needed to reach me directly, they would create a Hushmail or Protonmail mail account for that temporary purpose (like coordinating a trip somewhere). But that option is mostly dead.

I just had to reach out to plumbers for quotes. All of them are gmail-served. All I could do is refuse to share my email address and push them to use analog mechanisms. They are not hungry enough for business to alter their online workflow or create protonmail accounts.


cross-posted from: https://lemmy.dbzer0.com/post/26703241

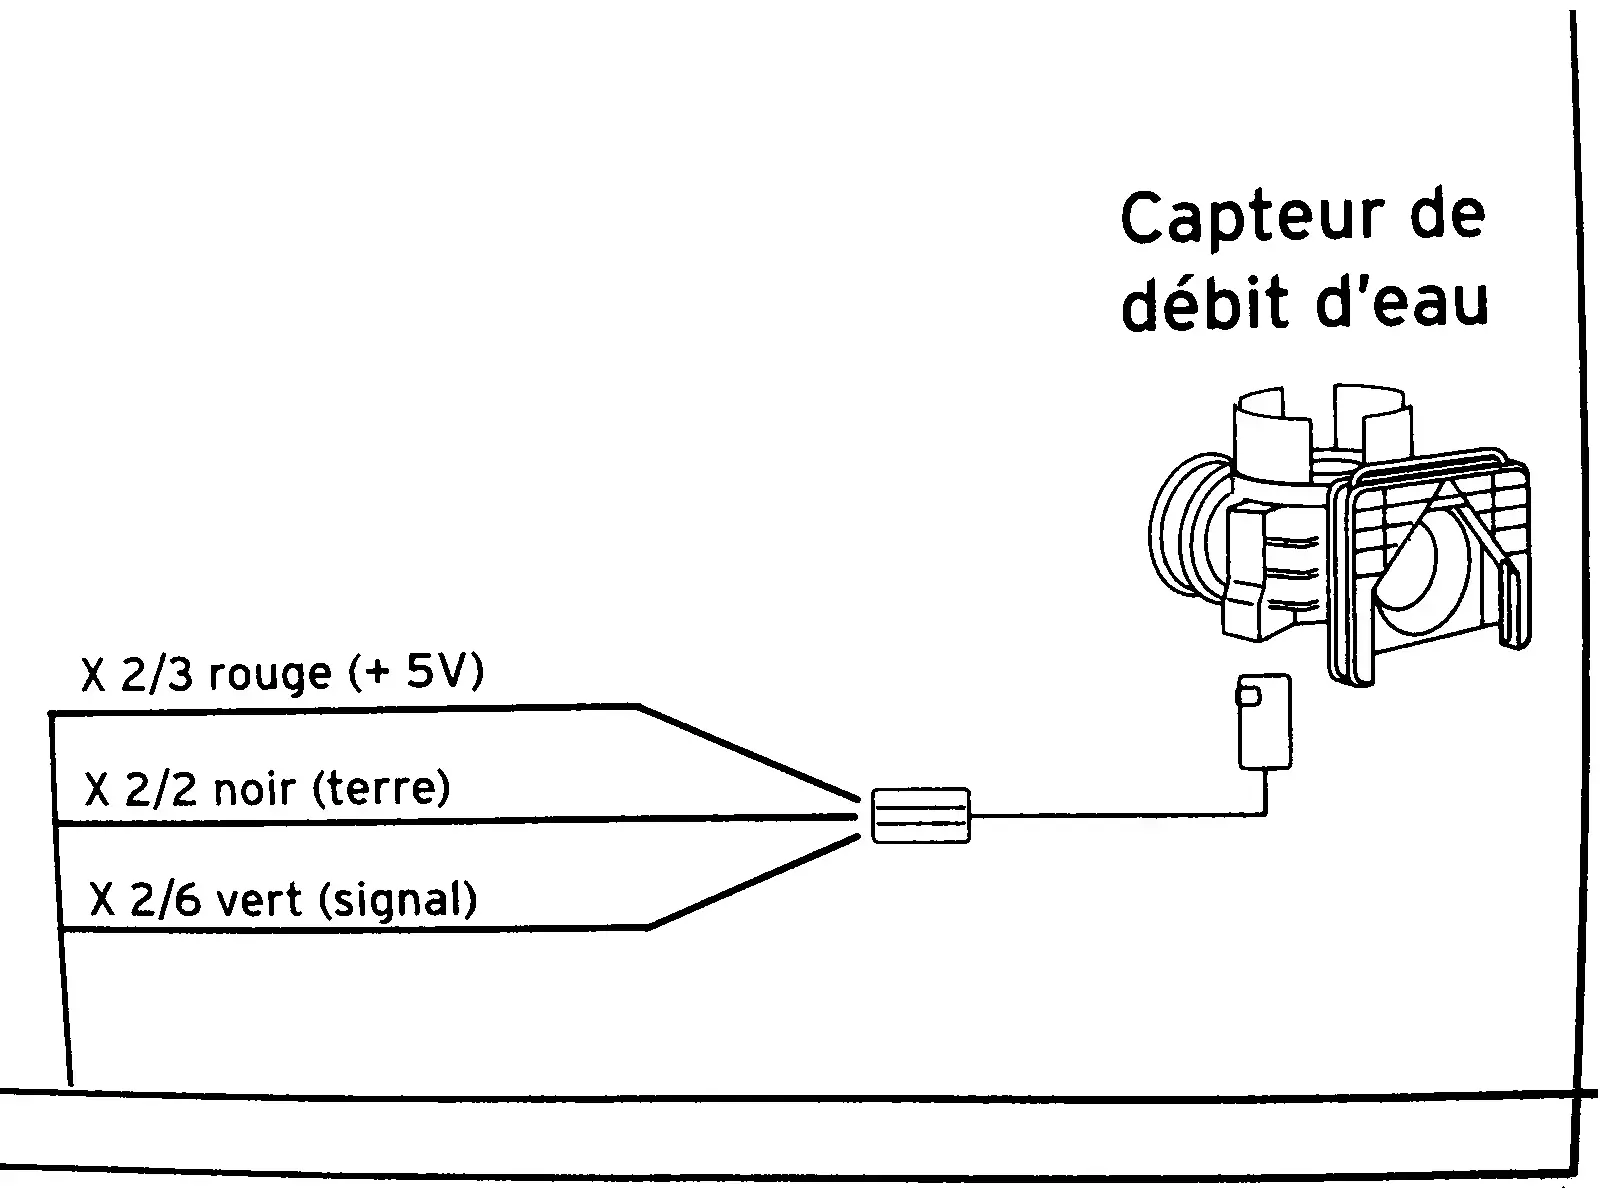
This diagram is from the service manual of a combi boiler. It’s a flow sensor which detects whether hot water is running, which is then used to trigger on-demand heat and switch a diverter to take radiators out of the loop.

In English, the diagram shows:

  • X ⅔ red wire (+5V)
  • X 2/2 black wire (ground)
  • X 2/6 green wire (signal)

I need to know what those fractions mean. I took the voltage measurements in this video:

I cannot necessarily trust the model in that video to have the same specs as mine. My voltmeter detected 4.68 V on the red input wire showing that the sensor is well fed. The green “signal” wire is supposed to be 0 V at rest and 2 V with water running (or I think the reverse of that is used in some models). In my case the green wire is ~1.33 V at rest and ~0.66 V when water is running. I need to know if these readings are normal as I troubleshoot this problem.

update


@[email protected] and a couple others gave the answer I was after. Then @[email protected] helped solve the underlying problem. The theory that the sensor was fine but the board was not drove me to test the sensor in isolation. The sensor gave correct output in isolation. Then I connected it back to the motherboard to retest and reconfirm that it’s still broken. But it actually worked. The hot water suddenly and mysteriously works now. I guess the act of draining the water and unplugging the connector then reconnecting and repressurizing caused it to work. It may be temporary, since in the past it was hit or miss whether it would work.


This diagram is from the service manual of a combi boiler. It’s a flow sensor which detects whether hot water is running, which is then used to trigger on-demand heat and switch a diverter to take radiators out of the loop.

In English, the diagram shows:

  • X ⅔ red wire (+5V)
  • X 2/2 black wire (ground)
  • X 2/6 green wire (signal)

I need to know what those fractions mean. I took the voltage measurements in this video:

I cannot necessarily trust the model in that video to have the same specs as mine. My voltmeter detected 4.68 V on the red input wire showing that the sensor is well fed. The green “signal” wire is supposed to be 0 V at rest and 2 V with water running (or I think the reverse of that is used in some models). In my case the green wire is ~1.33 V at rest and ~0.66 V when water is running. I need to know if these readings are normal as I troubleshoot this problem.


I have a Vaillant ecoTech Plus combi boiler. The central heating works fine. But the hot tap water became intermittent. If I got lucky and hot water would come from the tap, it never went cold as long as it was running. So I think it’s likely a flow switch because there were times when it simply did not seem to detect that hot water was on. I heard no boiler fan and the faucet icon did not appear on the display on the times it failed to produce hot water. The moments where it would work are now history. Now it’s cold water every time. So it was a gradual manifestation.

I popped the cover off and there’s some kind of scaling or buildup of something on the pump. The clip that holds something in place above the pump is corroded. So while the system behaves as if it does not detect water use, the pump does not look good. Would a faulty pump cause my issue?

About two years ago I had an intermittent hot water problem and it turned out the secondary heat exchanger was blocked by limescale. In that case the water would go cold mid-shower. The current intermittency problem is just with the initial switching on of hot water - no interruption once it was going. So I kind of doubt the heat exchanger is my issue.

Any theories?


I have a plastic cistern which has started leaking, only when flushing. The cisterns in the region are installed to sit on a foam ring (~12mm thick), which serves as a gasket. The foam eventually fails. I’m baffled because failing foam looks no different than new foam. They charge €10 for these gaskets that probably shouldn’t cost more like 50¢.

I bought a new gasket and it fails as well.

One shop had some uncommon gummy play-dough-like stuff for this purpose. It comes out in a strand with about the same diameter as a sharpie marker. So I stuck that to the toilet around the cistern ingress hole. Then I put an old foam disc on top of that and pressed it down. Even that leaks. Maybe I was supposed to really pile up this gummy stuff and not use the foam ring at all.

DiY shop says “buy a new cistern for €40”. I hate that option because it rewards the same poor design and I’d be spending more than I should have to.

Fuck that.

Alternatively the standards have changed and the new design is to have a thick rubber flanged gasket. But the ceramic ingress hole in the new toilets is also 80mm (~7mm bigger than mine). So I need a whole new toilet to upgrade to the new standard. What a disaster.

Fuck that.

So I went to a rubber fabrication specialist to get the new rubber gasket design in the size of the older toilets. He does not have a 3d printer, so for the 3D thing I need will cost €1000 to build the casting mold.

Fuck that.

All pressure is on to throw away a whole functional toilet because of a failed gasket. I hope that’s the nuclear option. I’m seriously considering grinding the ingress hole of the ceramic toilet to have the ø 80mm needed to install the newer rubber gasket. Has anyone done that? I have a carbide hole saw for ø 83, which would deny me the tight fit that I need. So am I better off using a dremel with a stone bit? Seems like that will take forever and maybe be a bit error prone. Even if I make the perfect hole, the inside of the rubber flange is also bigger than the cistern output port. So then I might need to improvise something to make the cistern mate tightly with the flange.

(edit)
Another possible hack: thinking of those Victorian toilet designs where the cistern is mounted close to the ceiling with a pull chain. Those toilets still exist, I think deliberately as a retro interior design. I wonder if there is some kind of plumbing kit that would have better sealing properties, and perhaps the cistern could be just raised 10cm or so and bolted to the wall. Though if it goes wrong, the toilet could become the shower for some unfortunate user.

update: solved


I was seriously baffled. The gummy stuff seems great. I could see no way for water to pass above, through, or below the gummy stuff. The only remaining possibility was water was the flush was faster than the bowl and backing up and spilling over the foam ring. So I put a ring of paper on it and retested. Still leaked but the paper ring is dry! wtf.. no possibilities left. I spent a lot of energy on the gasket.

When I first spotted the leak, my very first suspicion was that the plastic cistern could have a fracture because I’ve had one fail in that way before. So I filled it with water and set it over a bucket. Saw no leak. Apparently I was too hasty with that test. I just tested again and there is a fracture that water is very slowly dripping through. It’s so slow I thought it could only be happening on flushes (which reinforced the false negative of my 1st test).

Anyway, the fix is just to squirt some super glue into the fracture it possible, perhaps do some plastic welding on top of that using a soldering iron and a zip tie, then maybe put a bit of flex seal tape or roofing tape on top of that.

Glad I did not take a grinder to the motherfucker. I appreciate everyone’s feedback!

update: hmm.. not so easy


I just glued and taped. Still leaks. There are 3 cracks. I think these cracks were introduced when I screwed down the cistern (plastic piece of garbage). One of the cracks spans a rail so cannot be fixed externally. The inside of the cistern has a layer of styrofoam (probably to reinforce it). So I’m ½ tempted to cut the styrofoam and squirt epoxy on the inside bottom.

Alternatively, the normal fix is to buy a new plastic cistern (price: €40). But people keep throwing away plastic cisterns simply because the internal rubber ring gets scaling buildup and they do not sell the ring. I happen to have 10 new rings. So I guess my best move is to wait until the next cistern gets thrown away.


I just visited some web galleries of bathroom remodelers in the US, and it looks uncommon to have external shower fixtures. They tend to bury as much of the fixture as possible in the wall. From the photos, I don’t get the impression they are using thermostatic mixing valves. But it’s hard to tell. Can anyone confirm or deny?

I think I might favor external fixtures because they tend to be much cheaper and also more easily servicable.


Wondering if anyone has done this.

I have converted my showers to the external style of thermostatic shower valve. Made a huge upgrade to showering UX. Why not do the same for bathroom faucets?

It seems the same benefit could be had with the bathroom faucet, but no bathroom faucets in local shops have this capability (I didn’t check online nor would I shop online). So to wash my hands (or whatever), I start with full blast hot water to get the hot water hurried along the pipes. Then of course it can get screaming hot soon enough and I have to adjust the valve in the middle of what I’m doing.

So the hack I have in mind is to install a mixer valve that is intended for showers. It can be installed under the sink with the output of that going to the hot input of the faucet. Then when I put the faucet on full hot, it opens the hot input 100% just until the preset temp is reached, at which point adjustments are made automatically and instantly. This would give warm water as quickly as possible. If I really need screaming hot water for some reason, the mixer under the sink can be put on full (although I think I have to accept that those probably still have an upper limit).

view more: next ›